🧙♂️ The Smart Home Saga: How to Build Your Own Zigbee Gateway 🧙♀️
(With Full Alexa and Home Assistant Integration) 🌟
By Technomancer
📜 The Quest Begins: Scope
Your mission, is to create a powerful Zigbee gateway that can coordinate all Zigbee devices in your enchanted castle.
At the end of this adventure, your gateway will seamlessly integrate with Alexa and Home Assistant, ready to control your Zigbee-powered devices. 🌐
🎯 **Final Result: 🧙♂️ The Wizard’s Control Panel **
Imagine walking into your hobbit hole and commanding your lights, curtains, and magic cauldrons with just a whisper to Alexa or a wave through Home Assistant! 🏠💡
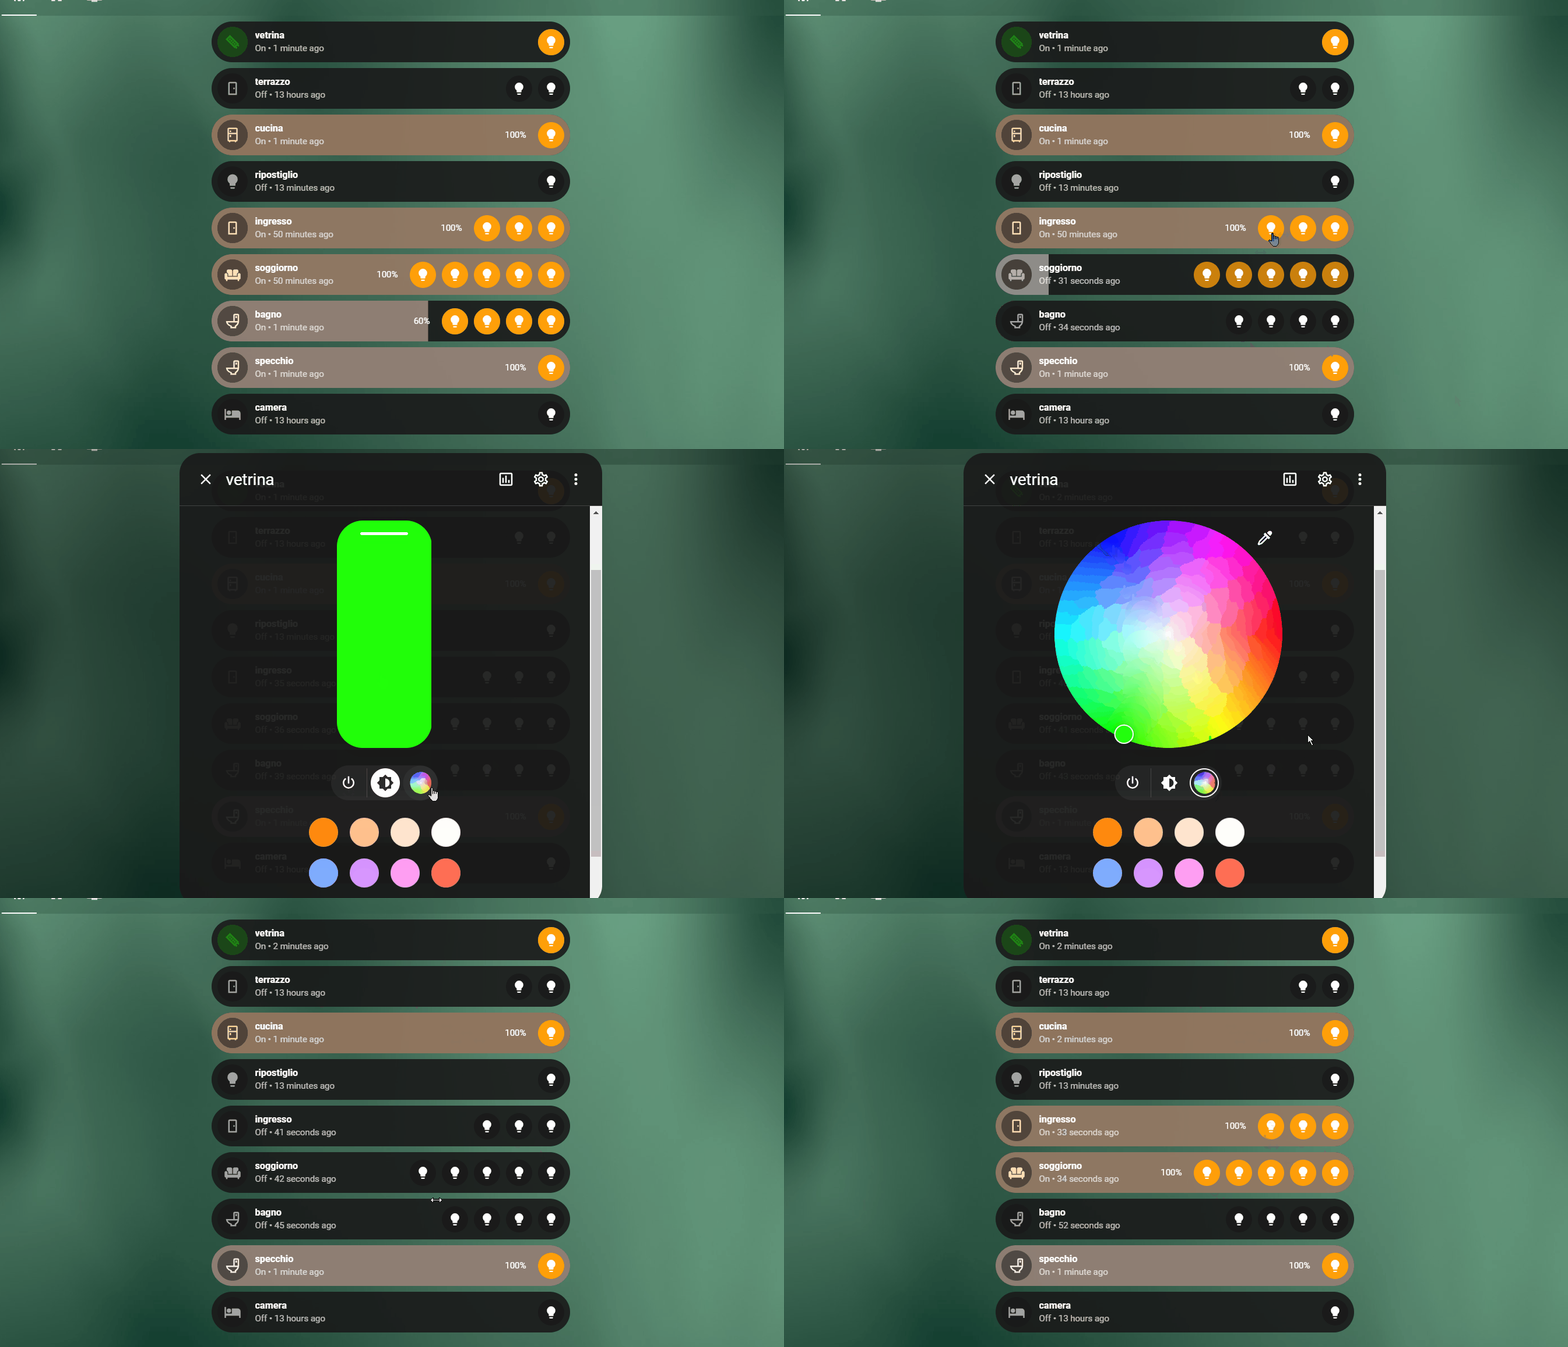
With this Zigbee Gateway, you’ll be the ruler of all things smart in your enchanted realm. Here’s a sneak peek of what your domain could look like:
🧚 Home Assistant Lights Control
A perfect blend of lights from the realms of IKEA and Philips!

👑 Alexa Lights Control
Magic at your fingertips—command lights with a single spell!
🧰 Requirements for this Magical Journey
Software
- Home Assistant (The Central Tower of Command) 🏰
- Mosquitto (Your trusted Messenger Dragon 🐉)
Hardware
- SONOFF ZBDongle-E (Your Magical Staff)
- Various Zigbee Devices (The enchanted tools of your domain)
🏰 Setting Up Home Assistant
🧙♀️ Home Assistant is the enchanted crystal ball that keeps an eye on all your Zigbee devices. Follow this mystical guide to summon it.
Once summoned, you’re halfway to becoming the Zigbee Oracle of your land! ⚡
🐉 Mosquitto
Every wizard needs a messenger dragon, and Mosquitto is just that. It speaks the MQTT protocol, a language of whispers between your Zigbee devices and the realm. Use this scroll to summon Mosquitto. 🧑💻
🔮 The SONOFF ZBDongle-E: Your Magical Staff
To become the master of your devices, you need a magical staff—the SONOFF ZBDongle-E.
You can enchant this staff using the Silabs Firmware Flasher.
Download the enchantment spell:
1 | ncp-uart-hw-v7.4.2.0-zbdonglee-115200.gbl |
🔍 Identify the Serial Port
Plug the device where you want to install and summon zigbe2mqtt.
Wizards often use bash scripts to identify magical ports.
Cast a spell from this tome to know your port’s name.
1 | muadib@arrakis:~$ ./ports.sh |
🧑💻 Installing Zigbee2MQTT: The Magic Gateway
First, open your wizard’s terminal and use Docker Compose to build your Zigbee gateway.
Here’s the incantation:
1 | zigbee2mqtt: |
Technical Breakdown:
container_name:
- This sets a static name for the Zigbee2MQTT container. This is particularly useful for referencing or troubleshooting because you won’t need to look up dynamically assigned container names.
image:
- Specifies the Docker image to use. In this case,
koenkk/zigbee2mqtt:1.39.1is a popular open-source image for managing Zigbee devices via MQTT. Version 1.39.1 is used to ensure compatibility and stability.
- Specifies the Docker image to use. In this case,
volumes:
- Mounts a local directory (
/media/media4/home/zigbee2mqtt) to the container’s/app/datadirectory. This is where Zigbee2MQTT stores configuration and device information, ensuring that data is persisted across container restarts.
- Mounts a local directory (
devices:
- Maps the Zigbee dongle connected to
/dev/ttyACM0on the host machine to the same path inside the container. This gives the container direct access to the physical Zigbee hardware needed to interact with Zigbee devices. - The dongle acts as a Zigbee coordinator, sending and receiving signals to and from Zigbee devices.
- Maps the Zigbee dongle connected to
restart: unless-stopped:
- Instructs Docker to automatically restart the container if it crashes or stops unexpectedly, unless a manual stop command is issued. This ensures high availability.
environment:
- Sets the
TZenvironment variable to define the timezone (Europe/Rome) for the container. This is important for logging events with accurate local timestamps, especially for troubleshooting or automation.
- Sets the
ports:
- Exposes port
8080on the host and maps it to port8080inside the container, enabling access to the Zigbee2MQTT web interface. This interface is useful for managing devices, viewing logs, and controlling Zigbee2MQTT operations.
- Exposes port
depends_on:
- This directive ensures that the
mosquittoservice (MQTT broker) starts before Zigbee2MQTT, as Zigbee2MQTT relies on Mosquitto to send/receive MQTT messages. However, it does not ensure the service is ready (health checks would be needed for that).
- This directive ensures that the
We are now ready for the zigbee2,qtt configuration
⚙️ Configure Zigbee2MQTT
Create a configuration.yaml file.
This spell controls the flow of magical MQTT energy between your Zigbee devices:
1 | homeassistant: |
This configuration outlines how Zigbee2MQTT interacts with Home Assistant, Zigbee hardware, and MQTT messaging infrastructure.
The MQTT broker serves as the core communication hub between Zigbee2MQTT and other smart home applications (e.g., Home Assistant). Zigbee devices communicate via the Zigbee dongle, and their states or commands are translated into MQTT messages.
Here’s a detailed technical breakdown of the Zigbee2MQTT configuration block
homeassistant block:
1 | homeassistant: |
homeassistant:
- This section is specifically configured to allow the integration between Zigbee2MQTT and Home Assistant.
legacy_entity_attributes:
- This is set to
falseto disable the legacy format for entity attributes in Home Assistant. The older format included additional metadata in MQTT messages that is no longer required by modern versions of Home Assistant. This reduces unnecessary message payload sizes, leading to faster response times and better performance in Home Assistant.
- This is set to
permit_join:
1 | permit_join: false |
- permit_join:
- Controls whether new Zigbee devices can automatically join the network. When set to
false, Zigbee2MQTT won’t allow new devices to join the network unless explicitly permitted via the UI or CLI. This adds security to prevent unauthorized devices from joining the network. - This setting can be temporarily changed when you want to pair a new device (e.g., from the Zigbee2MQTT UI).
- Controls whether new Zigbee devices can automatically join the network. When set to
mqtt block:
1 | mqtt: |
mqtt:
- This block defines the MQTT connection settings used by Zigbee2MQTT to publish and subscribe to MQTT messages.
base_topic:
- This sets the base MQTT topic (
zigbee2mqtt) under which all Zigbee devices will publish their data. For example, if a Zigbee light bulb is connected, its state (on/off) will be published under the topiczigbee2mqtt/<device_name>/state.
- This sets the base MQTT topic (
server:
- Specifies the MQTT broker address, in this case, it’s using the
mosquittobroker running atmqtt://<mosquitto_ip>:1883. Port1883is the default for MQTT. <mosquitto_ip>represents the IP address or hostname of the broker. This broker acts as the communication hub for Zigbee2MQTT and other devices or services, such as Home Assistant.
- Specifies the MQTT broker address, in this case, it’s using the
user/password:
- These fields define the authentication credentials required to connect to the MQTT broker. If the broker requires authentication (which is recommended for security), the
<mosquitto_user>and<mosquitto_password>fields should be filled with valid credentials.
- These fields define the authentication credentials required to connect to the MQTT broker. If the broker requires authentication (which is recommended for security), the
serial block:
1 | serial: |
serial:
- This section configures the serial communication settings between Zigbee2MQTT and the Zigbee coordinator hardware (e.g., a USB Zigbee dongle).
port:
- Specifies the serial port on the host machine where the Zigbee dongle is connected. In this case, the dongle is mapped to
/dev/ttyACM0. - This serial port provides the physical connection between the Zigbee network and the host, allowing Zigbee2MQTT to send and receive signals via the coordinator.
- Specifies the serial port on the host machine where the Zigbee dongle is connected. In this case, the dongle is mapped to
adapter:
- Defines the type of Zigbee adapter used. Here,
emberis specified, which refers to the EmberZNet chipset (commonly used in Sonoff Zigbee Dongle and other devices). - Other common adapters could be
zstack(for Texas Instruments-based adapters) ordeconz(for ConBee).
- Defines the type of Zigbee adapter used. Here,
frontend block:
1 | frontend: |
frontend:
- Configures the settings for the Zigbee2MQTT web interface that allows users to manage and monitor Zigbee devices via a browser.
port:
- The web interface is accessible via port
8080, allowing users to view logs, manage devices, and perform actions like pairing, resetting, or updating devices from a GUI. Users can access this interface throughhttp://<host_ip>:8080.
- The web interface is accessible via port
ota block (Over-the-Air Updates):
1 | ota: |
ota:
- This section controls the over-the-air (OTA) update behavior for supported Zigbee devices (such as IKEA or Philips Hue products).
update_check_interval:
- Specifies how often (in hours) Zigbee2MQTT checks for firmware updates for Zigbee devices. Here, it’s set to check every 10 hours.
- OTA updates allow supported devices to get firmware upgrades without needing to physically interact with the device.
disable_automatic_update_check:
1 | disable_automatic_update_check: false |
- disable_automatic_update_check:
- Controls whether Zigbee2MQTT automatically checks for new software updates for itself. When set to
false, the system will automatically look for updates to Zigbee2MQTT and notify users through the frontend. - Keeping this feature enabled ensures that you’re running the latest version of the software with bug fixes and new features, but you can disable it if you prefer manual updates.
- Controls whether Zigbee2MQTT automatically checks for new software updates for itself. When set to
From our docker-compose folder, we can summon the containers and unleash our magical spells 🧙♂️✨ with:
1 | docker-compose up -d |
If everything is in the right place and charged with enough mana 🔮, navigate to http://
🧹 Start Pairing Devices
Head over to your wizard’s console at https://<host>:8080 and enable permit join to start pairing your Zigbee devices! 🌈
- Enable: Permit join on zigbee2mqtt
- Activate pairing mode on your device.
- Wait for the magic to happen. ✨
Test your devices through the Zigbee2mqtt UI and bask in the power you now hold. 🎉

🤖 Configure Home Assistant: The Heart of the Realm
Using the power of the MQTT integration in Home Assistant, you can control your Zigbee devices!
Follow the wizardry within Home Assistant to link it with Zigbee2MQTT. 🌐
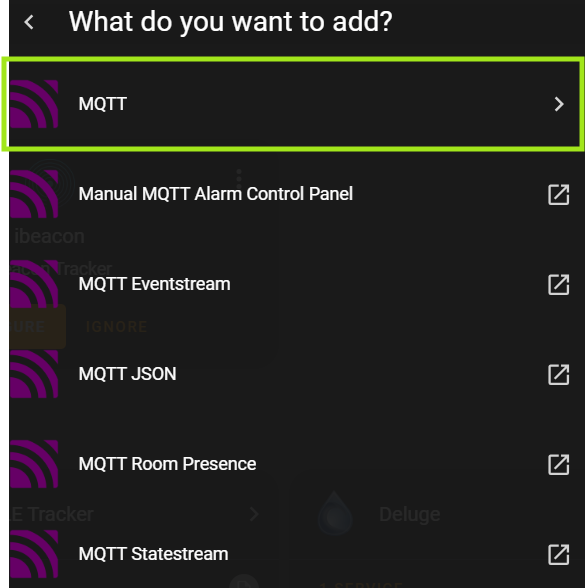
From the Home Assistant UI, add a new MQTT integration 🔄:

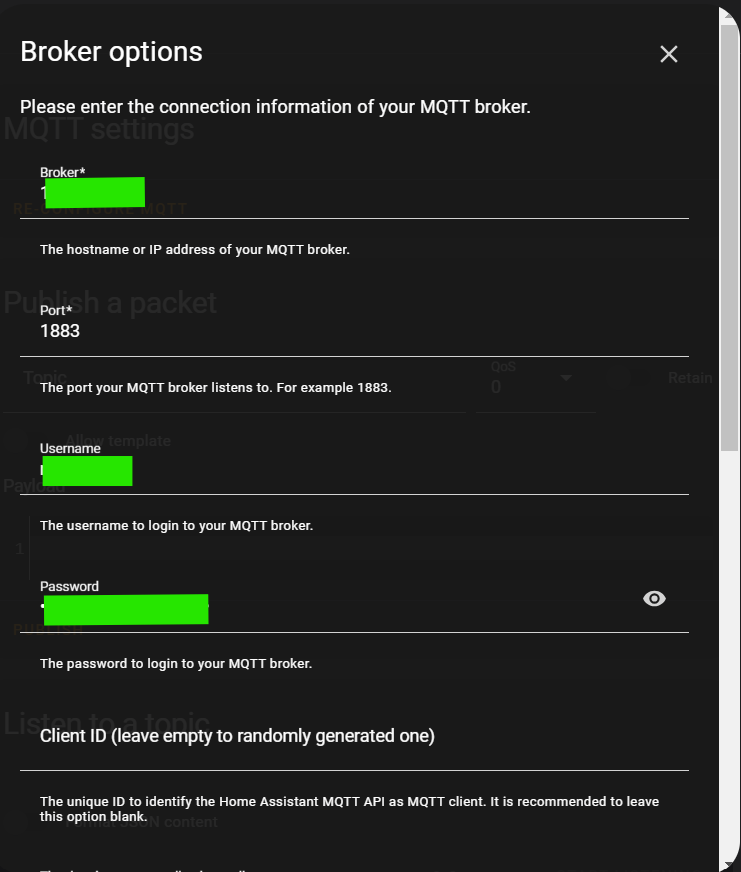
Configure it with your MQTT broker details:
- MQTT Host 🌐
- User 🧑💻
- Password 🔑

Once configured, you’ll be able to see and control all your Zigbee devices directly from Home Assistant! 🌟

🗣️ Alexa Integration: Speak, and the Magic Happens!
To communicate with Alexa, we’ll use the emulated_hue integration in Home Assistant.
Edit your configuration.yaml file to include your devices:
1 | emulated_hue: |
Restart home-assistant
Alexa will now recognize your devices as enchanted lights and let you control them with your voice! 🗣️✨
🌟 Conclusion: You’ve Mastered the Magic
Congratulations! You’ve completed the quest and built a Zigbee Gateway that allows full integration with Alexa and Home Assistant. Your lights, and any Zigbee devices, will now bend to your will with just a word or a tap. You are now the true Technomancer! 🧙♂️🌍
👑 May your smart home journey be filled with automation magic and convenience spells!
